
QuickTips: Tips & Tricks For Bookkeeping Success

But by setting a Closing Date within QuickBooks, you can protect anyone from creating havoc and chaos by going in and accidentally changing or making prior period transactions or adjustments. Read on to learn how.
Happy spring! Well, theoretical spring. … This year it seems like winter could make a surprise reappearance at any minute. But for those of us in the accounting world, we really can’t complain too much. Actually, we like it to stay cold and snowy all the way to the April tax deadline. That way we don’t have to feel bad about being inside for extended periods of time while trying to meet critical tax deadlines.
I digress. Now that the tax deadline is behind us, I just so happen to have a great tip for you this month! Today we’re going to learn how to set the Closing Date in QuickBooks® to help you effectively and efficiently close out the year.
You and your accounting professional have worked hard to get your taxes filed on time and it’s time to close out the year-end work and (finally) put it to bed.
Haven’t I already closed out last year’s books?
Normally, the books are considered closed after they’ve been reviewed, all adjusting entries have been made and reporting has been completed and sent off to investors, lenders and tax authorities.
But by setting a Closing Date within QuickBooks, you can protect anyone from creating havoc and chaos by going in and accidentally changing or making prior period transactions or adjustments. (If I’ve said it once, I’ve said it a million times: keeping your financial records in order and intact is hugely important to the success of your business.)
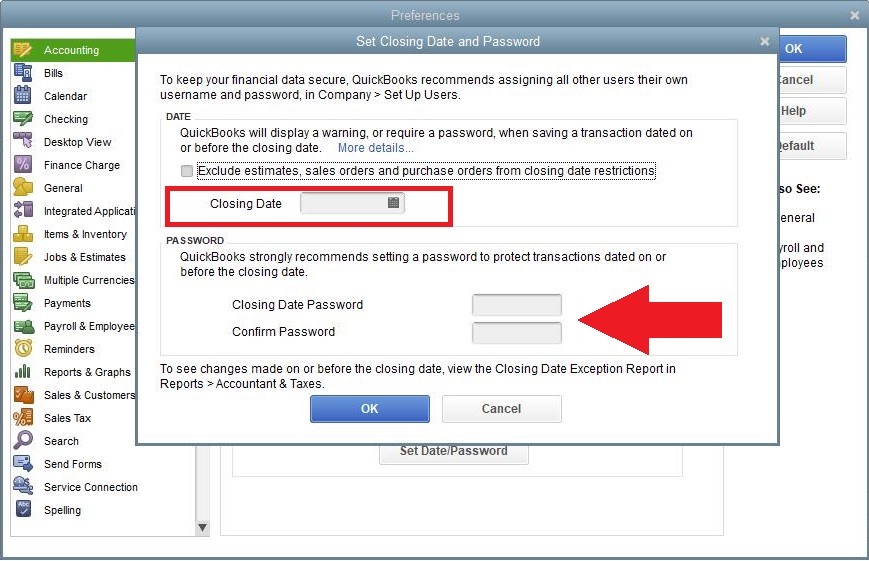
To ensure that the Closing Date restrictions are effective, only your administrator or external accountant can set the closing date and password. If an attempt is made to enter or change any transaction within the closed period, QuickBooks will automatically display a warning message. If you setup a Closing Date password, then it will prompt for the password.
Pro Tip: I recommend that you set up a Closing Date password. This is really the only way to maximize the security of this feature. If a password isn’t created, the user attempting to make a change will just receive a warning and will be asked to confirm whether the user really wants to make the change with a simple “yes” or “no” option. In addition, securing your Closing Date with a password will also save your accountant from having to go in and revise any beginning balances for the next year, which will ultimately save them time and you money.
QuickTip 1: Set Your Closing Date
For QuickBooks Desktop
Note only an administrator can do this and they must be in single user mode.
Go to “Edit” (at the top bar)
Select “Preferences”
Select “Accounting”
Then select the “Company Preference” tab.

In this tab, you will need to choose the option at the bottom to “Set Date/Password.”
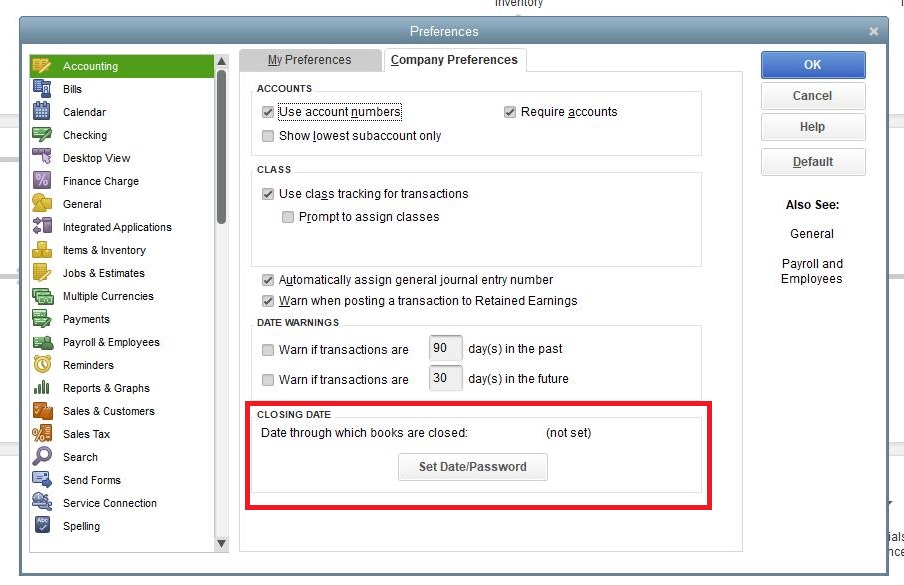
From there, a new window will open, which will give you the option to set your closing date AND set your password.
For QuickBooks Online
Only your program’s administrator or your accountant can make this change.
Go to the Gear Icon
Select “Your Company”
Select “Account and Settings”
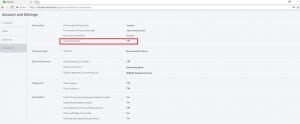
Turn on the option to “Close the books”
Finally, select the option to “Create a Password.”

QuickTip 2: Set The Account Prefill Option To Make Your Life Easier
Looking to save some time in QuickBooks? Of course you are! This little tidbit is a great timesaver and will help you make sure your transactions are posted properly. It is particularly helpful to establish consistency in the vendor record if you have vendors who are always assigned to the same account(s), this tip does that.
Simply open the “Edit Vendor” window in QuickBooks and click on the “Account Prefill” option.
Easy peasy!
QuickTip 3: Change Doesn’t Have To Equal Chaos
If you’ve ever had a staff change, then you know how handy a procedure book can be. The same is true about an accounting procedure book. Your accounting procedure book should have screenshots of mandatory fill-ins for all areas of QuickBooks – everything from how to set up a customer (especially if “Customer Types” or “Custom Fields” are being used), proper vendor setup (along with W-9 form and credit application), a listing of passwords, and the list goes on and on …
Having an accounting procedure book makes it easy for anyone to step in and assist with your company’s accounting. It particularly aides in one of the most important things to keep in mind when using QuickBooks – to keep lists and transactions consistent.
I hope you enjoyed this month’s Quicktips! Be sure to check out next month’s post for more!
Do you have QuickBooks tips or tricks that help you manage your business? I would love to hear from you. You can submit them by emailing Rea & Associates!
By Matt Long (Wooster office)