
As we quickly creep up on year-end, we often find ourselves staring at more than a few overlooked (or completely forgotten) responsibilities. Then, as we attempt to whittle down our workload, we find ourselves wishing that we had devoted a few hours over the summer to cleaning up our accounts or checking to make sure the information we’ve been collecting is current and complete.
But what if I told you that you can avoid beating yourself up in December by taking a little bit of time this month to get your QuickBooks® accounts in order. Keep reading to discover a few handy tips that will make your life a lot easier in the long run. This article will teach you how to:
- Merge accounts in QuickBooks®
- Apply credits for your customers
- Properly review your bank reconciliation
QuickTip 1: Merging Accounts In QuickBooks®
Do you have multiple accounts in QuickBooks® for the same thing? Does it get confusing? Why not combine those accounts into one?
QuickBooks® Desktop
- Choose which account you want to keep and which one you want to close after having merged it into the other.
- While in your chart of accounts, you’ll need to edit the account you want to merge. To do this, right click on the account and choose the “Edit Account” option.
- Next, change the name of the account you want to close to match the name account you want to keep. Note: It must match EXACTLY. If you are using account numbers, you’ll want to change the account number of the account you are closing to to match the account number of account you are keeping.
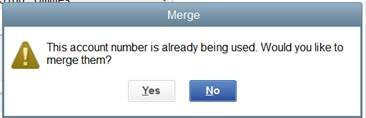
- Once you’ve made your changes to the account names, a pop-up box will appear. This box will state: “This account number is already being used. Would you like to merge them?”

- Click the “Yes” button.
CAUTION: Once you combine two accounts they can NEVER be separated. There is NOT an undo button. Before proceeding with this tip, be sure you want to combine them.
BONUS TIP: This can also be done with your Customer lists and Vendor lists if you have accidentally created multiples on those lists.
Click here to receive QuickTips: Tips & Tricks For QuickBooks® Success in your inbox every month!
QuickBooks Online
For the online edition of QuickBooks®, the merge process will be the same as above, only you will also need to make sure that the “Detail Type” on the account you want to merge is the same as the account you want to keep.
QuickTip 2: Apply Credits For Your Customers
Have you ever needed to apply credits for your customers? While it’s actually quite simple to create credit memos for your customers in QuickBooks®, it’s important to know that any applied credits won’t affect your customer’s invoices/statements until after you’ve “applied the credits.” Keep reading to find out how to do this.
QuickBooks® Desktop
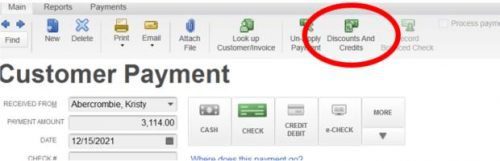
- Go to the Customers menu and click “Receive Payments.”
- In the Receive Payments window, click the “Received From” option from the drop-down list and choose the customer to whom you’re applying the credit.
- Click in the Payment column to select the invoice or billing statement you would like to apply the credit to. Be mindful that you do not click in the check mark column.
- Then, click the “Discount & Credits” button.
- Finally, click “Done” and save the credit.
QuickBooks® Online
To apply the Credit Memo to an invoice when using the online edition of QuickBooks®, do the following:
- Select the Plus icon (+) at the top > Receive Payment.
- Complete these fields as follows:
- Customer: From the drop-down list select the customer the credit memo is for.
- Date: Change if necessary.
- Amount received: Payment Method: and Reference no.: fields are to be left blank.
- Memo: (Optional)
- Deposit To: Leave blank since money isn’t actually being deposited with this transaction.
- Select the Invoice that you want to apply the Credit Memo against.
- Select the Credit Memo that you are wanting to apply to the invoice
- Verify that the total to pay (if any) is correct after applying the Credit Memo then click Save.
QuickTip 3: Review Your Bank Reconciliation
Oftentimes, we go through the motions of doing our bank reconciliations, but we don’t always look at the report once it’s printed. It’s important to review the detailed report from time to time to (at the very least) make sure that the lists of outstanding items really are outstanding. When you look at the list of uncleared deposits, take a moment to determine if they are current or if they from a long time ago? When was the last time you took your deposit to the bank and it didn’t clear in a few days? Perhaps items were entered twice and now is the best time to correct that. Also look at the uncleared checks and payments. Do you need to contact your vendors to see if there was an issue with a check? Perhaps they need you to reissue that check.
Reviewing the information included in report is important as you close in on the end of the year. It’s so important to be sure everything is as accurate as possible before tax time.
By Matt Long (Wooster office)