
 It’s finally starting to feel like summer, which means you are probably trying to squeeze as much time in the sunshine as possible. I don’t blame you. In fact, I’m trying to do the same thing! Just don’t forget that a little bit of preparation and foresight can go a long way at year-end. In addition to some handy tips that will help you save time in your day-to-day activities, I’ve included an excellent tip that will help you get a jump on year-end tasks now. Don’t worry, it’s not going to add a ton of time to your work day. The trick is to get into a new routine. Trust me, you will thank me by the time November rolls around again.
Keep reading to learn the following QuickTips:
- How to find related transactions.
- How to locate the built-in calculator.
- How to set up your 1099 vendors early to avoid headaches later.
QuickTip 1: Easily Find Related Transactions
Finding payments associated with a specific invoice or a check connected to a bill doesn’t have to be a time-consuming exercise. Instead, follow these tips for instant work stress relief.
QuickBooks® Desktop
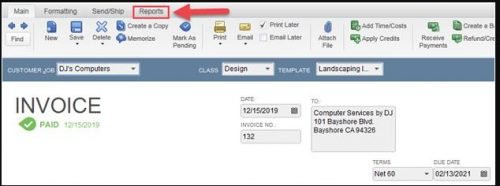
- While viewing an invoice or a bill click on the reports tab at the top of the window.

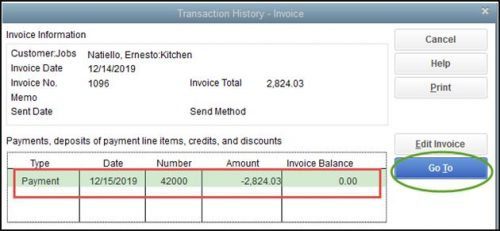
- Select Transaction History and the window will open showing all related transactions.
- To view the payment received, simply click on the “Go To” button.
QuickBooks® Online
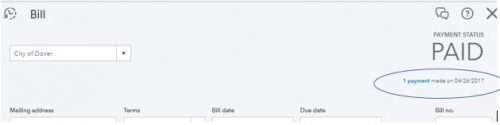
- While viewing any transaction in QuickBooks®, details of related transactions can be found in the upper right corner.
- Click on the link for more detail.
QuickTip 2: Tap On Your Built-In Calculator
QuickBooks® Desktop
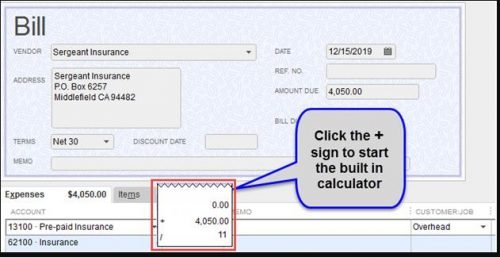
Do you ever find yourself having to add several numbers to come to a total to enter in QuickBooks®? Of course you have! Did you know that there is a built-in calculator in every amount field in the Desktop edition QuickBooks®? It’s true … and it has come in handy for us more than once!
- Simply tab the +, -, / or * key on your keyboard the calculate will activate.
- Calculate your problem as you normally would with any other calculator.
QuickBooks® Online
- Unfortunately, the online edition of QuickBooks® won’t show you calculations like it does in the desktop version. However, you can still find your answer by entering your equation into the amount field. For example, click on the amount field you would like to populate with the answer.
- Next, enter the formula “5 + 10.”
- Then, hit the “Tab” key on your keyboard.
- Finally, stare in wonder as the answer to your formula (15) appears in the amount field!
QuickTip 3: Set Up Your 1099 Vendors Earlier Instead Of Later
I know you’re thinking, I don’t have to print or file 1099’s until the end of the year why should I worry about it now? Well, if you do the work now to clean up your existing vendors and make sure your new vendors are set-up properly from day 1, your end of year processing will be a breeze.
Whenever you have a vendor that may be eligible for a 1099, follow the steps outlined below. Not sure which vendors qualify, contact your Rea advisor for help.
All vendors that are eligible for a 1099 should fill out a Form W9, which can be accessed on the IRS website. This form ensures that you will have all the information needed to set up the account.
QuickBooks® Desktop
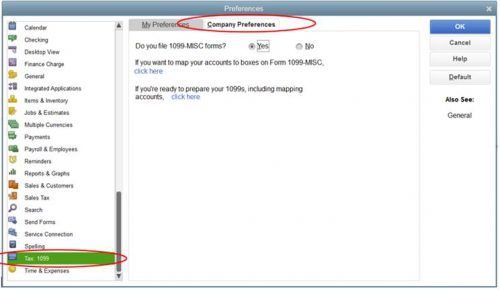
- The first step is to change the preference set-up. To do this, go to “Edit” on the menu bar and select the “Preferences” option.
- After the preferences box appears, select Tax:1099 in the left column and select the company preferences tab, which appears along the top.
- You will then select the “Yes” option, which will indicate that you will file 1099-forms.
- Next, click on the “click here” link to map your accounts to boxes on Form 1099-Misc. NOTE: This is very specific to your company’s chart of accounts. If you are new to filing 1099 forms this is definitely something you may want to discuss with your CPA.
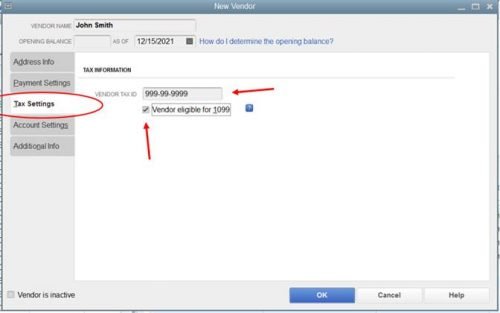
- Then you will need to mark which vendors are eligible to receive 1099 forms. To do this, you will need to click on the tax settings tab on the left side of the vendor edit screen.
- This is where you will input the vendor’s tax identification number, which you can obtain from the vendor’s Form W9.
- Finally, mark the box that states that the vendor is eligible for a 1099.
Now you will be better prepared to run your reports and forms when the time comes.
QuickBooks® Online
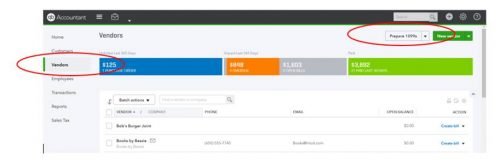
- To set up your 1099 forms, first click on the “vendors” option on the left-hand side of the page.
- Then click the “prepare 1099s” option in the bar located in the upper, right-hand corner of the page.
- You will then be directed through several step-by-step screens which will allow you to review your company’s tax information (including your address and tax ID). This information is important when it comes to mapping your accounts.
- Once again, if you are unsure as to whether a particular vendor should receive a 1099 Form, contact your CPA for help.
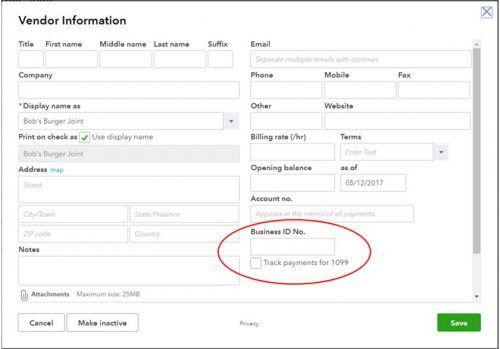
- Next, set up your vendors.
- In the online version of QuickBooks® you will see that all the vendor set-up information is on one screen. So while editing an existing vendor or creating a new vendor you’ll want to make sure that their tax id number is correct and that they are marked as eligible to receive 1099’s.
By Matt Long (Wooster office)